Online Batch Services
LexisNexis has enhanced its batch services to allow more user-friendly functionality for uploading batches and mapping layouts. Users sign in to the main product to access the online batch services,
via which they can attach files for submission, define batch fields, select options such as phone and address output, and provide confirmation of file receipts.
Topics in this section are listed below:
Common Steps
This section describes the steps that are applicable to all of the batch services. They are: Select the File to Upload, Define Field Labels, and Permitted Use Certification, DPPA Compliance and DMF Compliance.
Steps that are applicable to only a specific batch service are described in that individual section.
Select the File to Upload
This is to allow users to select the batch file for processing.
- Enter an alpha-numeric string in the Batch reference name field. This is required information. It is later referenced as Job Name on the Batch Confirmation page.
- Click the Choose File button for the File to Process field. The File Upload/Open dialog box will display.
- Locate the batch file to submit and click the Open button. The file path displays in the File to Process field.
Note 1: The file cannot contain more than 200,000 records. If it does, you will get a message before proceeding to the next step, informing you of the file size error.
Note 2: The number of records in the file is used to calculate the cost of batch processing, which is shown in Batch Confirmation.
- Check the appropriate radio button for File Type. Select ASCII Fixed Width if the file contains simple text; check ASCII Delimited if the file name has the .csv extension.
If the File Type is ASCII Delimited, in the Delimiter field,
- Choose Comma if the input fields are separated by commas;
- Choose Tab if the input fields are separated by tabs;
- Or chose Pipe if the input fields are separated by pipes (|).
- Enter Email Address for Batch Notification. An email will be sent to this address when the batch processing is complete. This is required information. However except for the format, the system does not check if the email address is valid and working. So please be very careful when you enter the information to ensure you will receive a notification.
- Re-enter the email address to Confirm Email Address.
- Click the Next button to proceed to the next step or click the Back button to return to the Append Fields page.
Define Field Labels
In this step users define the data type for each of the columns in the batch file, be it SSN, name, or phone number.
For Fixed Length Text File
In this type of files each record has exactly the same length.
If you select ASCII Fixed Width for file type, the Define Field Labels screen will show the beginning and ending positions (represented by numbers) of each field.
- Check the box YES if the first row of the batch file is a title row that contains the text descriptions of the corresponding fields. The service will calculate the charge by deducting one from the row number. Ignore this box if the first row contains data. The service will include the first row in calculating the charge.
- Use the down arrow to display a list in the Select Template from List field. This is applicable only if you have saved layouts (i.e. have in your previous batch processing entered alpha-numeric strings in the Save This Template File Layout field at the bottom of this page). If this is your first time processing a batch file, or if you never saved any layout from the previous jobs, the list will be empty.
- If you select a template from the saved list, you will be prompted for confirmation.
- Click the OK button to confirm the selection.
Note: To delete a template that is not needed anymore go to section Delete a Template.
- Use the down arrow in Column 1 to display a list of pre-defined data types (which differ with different batch services) and select one that is proper for the data in this column. For example, if the data in this column is the last names, you should select Last Name.
- Use the down arrow by Start to select the beginning position of the field.
- Use the down arrow by End to select the ending position of the field.
Note: You need to count in all the reserved spaces for a field. For example, if the reserved spaces for the Last Name is 15, even though in the actual file the longest last names takes only 12 spaces, you still set the Start as 1 and End as 15.
- Click Add New Field. Column 2 appears below Column 1.
- Use the down arrow by Column 2 to select a proper data type for the second field. If none of the labels in the list applies to the data in a column, select Not Applicable. This will allow the system to return this data field but ignore it for the purposes of locating your subjects.
- Repeat Steps 4 and 5 to set the Start and End positions for the second field.
- Repeat the steps above until you are done with all the fields in the file.
- Entered an alpha-numeric string in the Save This Template File Layout (Optional) field. (No special characters are allowed. You will get an error message if you use them.) You may use the search criteria to name the template, or use the batch name plus output options. For example, People Batch By SSN. Once you enter something here, the data types and positions defined in Steps 3 to 9 will be saved for future usage (i.e. for use in Step 2 of all other batch jobs).
- Click the Next button to proceed to the next step.
For ASCII Delimited File
If your file type is ASCII Delimited,
- Check the box YES if the first row of the batch file is a title row that contains the text descriptions of the corresponding fields. The service will calculate the charge by deducting one from the row number. Ignore this box if the first row contains data. The service will include the first row in calculating the charge.
- Use the down arrow to display a list in the Select Template from List field. This is applicable only if you have saved layouts (i.e. have in your previous batch processing entered alpha-numeric strings in the Save This Template File Layout field at the bottom of this page). If this is your first time processing a batch file, or if you never saved any layout from the previous jobs, the list will be empty.
- If you select a template from the saved list, you will be prompted for confirmation.
- Click the OK button to confirm the selection.
Note: To delete a template that is not needed anymore go to section Delete a Template.
- Use the down arrow in Column 1 to display a list of pre-defined data types (which differ with different batch services) and select one that is proper for the data in this column. For example, if the data in this column is the last names, you should select Last Name.
- Repeat the step above for the remaining columns. If none of the labels in the list applies to the data in a column, select Not Applicable. This will allow the system to return this data field but ignore it for the purposes of locating your subjects.
- Enter an alpha-numeric string in the Save This Template File Layout (Optional) field. (No special characters are allowed here. You will get an error message if you use them.) You can use the search criteria to name the template, or use the batch name plus output options. For example, People Batch By SSN. Once you enter something here, the data types defined in steps 3 and 4 will be saved for future usage (i.e. for use in Step 2 of all other batch jobs).
- Click the Next button to proceed to the next step.
Delete a Template
You can save up to 10 templates. After that, if you attempt to save more you will get an error message. To save a new template, you will have to delete a previously saved template.
- From the Define Field Labels screen use the down arrow and select a template you do not wish to use anymore from the Select Template from List. You get a prompt for selection confirmation.
- Clicking OK to confirm the action.
- Clicking the Delete Selected Template bar on the right. You are prompted to confirm the deletion.
- Click OK. The template is deleted from the saved templates list.
Permitted Use Certification, DPPA Compliance and DMF Compliance
Users must select the proper Permitted Use Certification (also referred to as GLB Purpose), DPPA Compliance (also referred to as DPPA Purpose) and DMF Compliance to proceed to the Batch Confirmation.
Back to Top
Submit a Deceased Person Batch
The Deceased Person Batch allows a user to run a search on a subject by LexID, name, and/or social security number to determine if and when they passed away as well as verify subject name, social security
number, date of birth, and last known address.
Select the File to Upload
To start, click the Deceased Person link from the Batch Services main page. The Select File page displays. For details please reference section Select the File to Upload
of Common Steps.
Define Field Labels
In this step users define the data type for each of the columns in the batch file, be it SSN, name, or phone number.
For details please reference section Define Field Labels of Common Steps.
The following is a list of data types for Deceased Person Batch:
- Not Applicable
- LexID
- Full Name
- First Name
- Middle Name
- Last Name
- Generational Suffix
- DOB
- Social Security #
- Address Line 1
- Address Line 2
- Address Line 3
- City
- State
- Zip
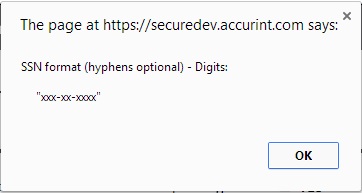
Note: Off this list the system validates the format of only the Social Security Number. If the data is in conflict with the predefined data format, you will get a message, alerting you of the correct format for the data.
Permitted Use Certification, DPPA Compliance and DMF Compliance
For details please reference section Permitted Use Certification, DPPA Compliance and DMF Compliance of Common Steps.
Batch Confirmation
This page allows users to review this batch setting and options, input file name and format, email address for notification, and the approximate charge for this job, prior to batch submission. If this information needs to be edited, you can click the Back button until you reach the desired page.
If all selections and information are listed as requested, click the Authorize Order button. A summary page with your batch job confirmation number plus other batch output details will appear.
To print the information on the screen, click the Print Order Confirmation button.
To run another batch job, click Run Another Batch button to return to the Batch Services main page.
Back to Top
Submit an Advanced Person Batch
The Advanced Person Batch enables users to locate personal identifiable information on subjects including full name, social security number, date of birth, up to three addresses with phone numbers, and deceased information.
Append Fields
This step is for users to set batch file output options with additional cost. You do not have to make a selection if you do not desire any of the options.
- To start, click the Advanced Person Batch link from the Batch Services main page. The Append Fields page displays, where you can pick output options for your batch file.
Note: There are two sections for selection on this page: Select Special Processing Options on the top and Additional Processing Options at the bottom. Users can select up to 3 subjects to be returned. Users can also select up to 3 addresses to be returned for each subject, including a phone number for each address. In addition, users can search for a deceased record for each returned subject and have a date of death appended to the output record.
- Click the Next button to proceed to the next step or click the Back button to return to the Batch Services main page.
Select the File to Upload
This will allow users to select the batch file for processing. For details please reference section Select the File to Upload of Common Steps.
Define Field Labels
In this step users define the data type for each of the columns in the batch file, be it SSN, name, or phone number.
For details please reference section Define Field Labels of Common Steps.
The following is a list of data types for Advanced Person Batch:
- Not Applicable
- LexID
- Full Name
- First Name
- Middle Name
- Last Name
- Generational Suffix
- DOB
- Social Security #
- Address Line 1
- Address Line 2
- Address Line 3
- City
- State
- Zip
- Phone Number
- Phone Number 2
- Phone Number 3
- Driver's License Number
- Driver's License State
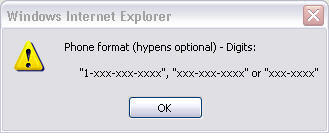
Note: Off this list the system validates the format of only two: the Social Security
Number and the Phone Number. If the data is in conflict with the predefined data format, you will get a message, alerting you of the correct format for the data.
Permitted Use Certification, DPPA Compliance and DMF Compliance
For details please reference section Permitted Use Certification, DPPA Compliance and DMF Compliance of Common Steps.
Batch Confirmation
This page allows users to review this batch setting and options, input file name and format, email address for notification, and the approximate charge for this job, prior to batch submission. If
this information needs to be edited, you can click the Back button until you reach the desired page.
If all selections and information are listed as requested, click the Authorize Order button. A summary page with your batch job confirmation number plus other batch output details will appear.
To print the information on the screen, click the Print Order Confirmation button.
To run another batch job, click Run Another Batch button to return to the Batch Services main page.
Back to Top
Submit an Advanced Sex Offender Solution (ASOS) Batch
The LexisNexis Advanced Sex Offender Solution (ASOS) offers a nationwide tracking system on movement and other information relating to registered and non-compliant sex offenders. The web-based solution provides weekly comprehensive reporting for sex offenders in counties you are monitoring - where they have moved from and to along with best known contact information.
Select the File to Download
This will allow users to select the state file to download.
- Click on the name of the desired file.
- In the File Download window that opens
click Save.
- In the Save As window, select a location
to save the file and click Save.
- When the file has been saved, the window will close
and the ASOS file screen will be displayed again.
Note: The files on this screen can be downloaded as many times as needed.
Back to Top
Submit a People Batch (including Address and Phone Searches)
This process uses the Accurint linking technology to attempt to find addresses and phone numbers associated with the subject. Available settings allow users to get only new/different information than
what has been provided as well as property information for up to five addresses.
Append Fields
This step is for users to set batch file output options with additional cost. You do not have to make a selection if you do not desire any of the options.
- To start, click the People Batch (including Address and Phone searches) link from the Batch Services main page. The Append Fields page displays, where you can pick output options for your batch file. Each option has a pricing listed based on the chosen selections.
Note: There are two sections for selection on this page: Select Special Processing Options on the top and Or Choose one of the following Special Batch Options at the bottom. If you select one, the other will be grayed out.
- Check one option from the top or bottom section. To uncheck, click on the check mark. To get information on each option, click the info button
 on the right of the option. A description box will pop up with more information on the selected option.
- Click the Next button to proceed to the next step or click the Back button to return to the Batch Services main page.
Select the File to Upload
This will allow users to select the batch file for processing. For details please reference section Select the File to Upload of Common Steps.
Define Field Labels
In this step users define the data type for each of the columns in the batch file, be it SSN, name, or phone number.
For details please reference section Define Field Labels of Common Steps.
The following is a list of data types for People Batch:
- Not Applicable
- LexID
- Full Name
- First Name
- Middle Name
- Last Name
- Generational Suffix
- Address Line 1
- Address Line 2
- Address Line 3
- City
- State
- Zip
- Postal Code
- Social Security Number
- Phone Number 1
- Phone Number 2
- Phone Number 3
- Date of Birth
- Driver's License Number
- Driver's License State
Note: Off this list the system validates the format of only two: the Social Security
Number and the Phone Number. If the data is in conflict with the predefined data format, you will get a message, alerting you of the correct format for the data.
Permitted Use Certification, DPPA Compliance and DMF Compliance
For details please reference section Permitted Use Certification, DPPA Compliance and DMF Compliance of Common Steps.
Batch Confirmation
This page allows users to review this batch setting and options, input file name and format, email address for notification, and the approximate charge for this job, prior to batch submission. If this information needs to be edited, you can click the Back button until you reach the desired page.
If all selections and information are listed as requested, click the Authorize Order button. A summary page with your batch job confirmation number plus other batch output details will appear.
To print the information on the screen, click the Print Order Confirmation button.
To run another batch job, click Run Another
Batch button to return to the Batch Services main page.
Back to top
Submit a Phones Plus Batch
Phones Plus searches approximately 720 million phone numbers not currently found in Electronic Directory Assistance. These numbers may include cell phone and non-published numbers. Phones Plus search provides yet another alternative to find otherwise difficult to locate subjects.
Append Fields
In this step you set the output options for the batch at additional cost.
- To start, click the Phones Plus Batch link from the Batch Services main page. The Append Fields screen displays.
- There are two options on the screen: Select Special Processing Options on the top and Additional Processing Options at the bottom. Users can select up to 3 subjects to be returned. Users can also select up to 3 addresses to be returned for each subject, including a phone number for each address. In addition, users can search for a deceased record for each returned subject and have a date of death appended to the output record.
- Click the Next button to proceed to the next step or click the Back button to return to the Batch Services main page.
Select the File to Upload
This will allow users to select the batch file for processing. For details please reference section Select the
File to Upload of Common Steps.
Define Field Labels
In this step users define the data type contained in each of the columns within the batch file, be it SSN, name, or phone number.
For details please reference section Define Field Labels of Common Steps.
The following is a list of data types for Phones Plus Batch:
- Not Applicable
- LexID
- Full Name
- First Name
- Middle Name
- Last Name
- Generational Suffix
- Address Line 1
- Address Line 2
- Address Line 3
- City
- State
- Zip
- Social Security #
- Phone Number
- Phone Number 2
- Phone Number 3
- DOB
- Driver's License Number
- Driver's License State
Permitted Use Certification, DPPA Compliance and DMF Compliance
For details please reference section Permitted Use Certification, DPPA Compliance and DMF Compliance of Common Steps.
Batch Confirmation
This page allows users to review this batch setting and options, input file name and format, email address for notification, and the approximate charge for this job, prior to batch submission. If this information needs to be edited, you can click the Back button until you reach the desired page.
If all selections and information are listed as requested, click the Authorize Order button. A summary page with your batch job confirmation number plus other batch output details will appear.
To print the information on the screen, click the Print Order Confirmation button.
To run another batch job, click Run Another Batch button to return to the Batch Services main page.
Back to top
Submit a Waterfall Phones and Address Batch
This process allows customers to choose to return multiple or single phone numbers, set the level of matching to be used and return only new/unique phone information than what has been provided.
Append Fields
- To start, from the Batch Services main page, click the Waterfall Phones and Address link. The Pricing Notice pops up.
- Click the Continue button after reviewing. The full Append Fields page displays. There are three search options (Search for Phones; Search for Addresses; and Search for Phones and Addresses) and two output options (Phone Append and Address Append). Search for Phones and Search for Addresses are mutually exclusive.
- Make a search option selection by checking one of the radio buttons. If you select Search for Phones, the Address Append option will hide; if you select Search for Addresses, the Phone Append section will hide. If you select Search for Phones and Addresses, both Phone Append and Address Append sections will show.
- Work the Phone Append option:
- Select an option in the Select Confirmation Process section. Options include None, Confirmation Flag, and Blank out Matched Numbers.
- Check or ignore the option box for Return Optional Phone Line Type Field. This option, when checked, will append the phone line type (ie Cell, POTS, VOIP) with each phone.
- Check or ignore the option box for Return Optional Carrier Information. This option, when checked, will append the carrier name, location, and description for each phone.
- In the Additional Phone Options section, use the down arrow to select Total (max) number of phone numbers to be returned.
- Work the Address Append section:
- Check (if you selected Search for Addresses in Step 3) or ignore option Only return addresses which differ from any provided address. This option will append an address ONLY if it does not match the input address for the subject. This is not required information. Once you check this option, you will need to select one from the other three options that are right below to make this option work properly.
- The first option is Do not return any addresses. Check this option if you do not want anything returned when
the address found is a duplicate of the input address.
- Return next most current address will return the next most current address to the input address.
- If you select neither of the above, check the Blank out Matches and return confirmation flag option. This option will set a flag to indicate that the address is either our most current address (C) or a historic address (H).
- Use the down arrow to select the Number of addresses to be returned. The default is set to 1. This is required setting and it works in combination with the next option.
- Enter a number to indicate the Number of months of address history. The maximum value is 120. If an address is older than the number defined here it will not be returned. This is required setting and it works in combination with the previous option.
- Click the Next button to proceed to the next step or the Back button to return to the Batch Services main page.
Select the File to Upload
This will allow users to select the batch file for processing. For details please reference section Select the File to Upload of Common Steps.
Define Field Labels
In this step users define the data type contained in each of the columns within the batch file, be it SSN, name, or phone number.
For details please reference section Define Field Labels of Common Steps.
The following is a list of data types for Waterfall Phones and Addresses Batch:
- Full Name
- First Name
- Middle Name
- Last Name
- Generational Suffix
- Address 1
- Address 1 Line 2
- City 1
- State 1
- Zip 1
- Address 2
- Address 2 Line 2
- City 2
- State 2
- Zip 2
- ... (previous fields starting with Address 2 will be repeated to allow for up to 6 entries)
- Phone 1
- Phone 2
- Phone 3
- Phone 4
- Phone 5
- Phone 6
- Phone 7
- Phone 8
- Phone 9
- Phone 10
Permitted Use Certification, DPPA Compliance and DMF Compliance
For details please reference section Permitted Use Certification, DPPA Compliance and DMF Compliance of Common Steps.
Batch Confirmation
The confirmation page for this batch service does not give an estimate of total costs of the job, as it depends on the number of hits in the output, not on the number of input records.
If all selections and information are listed as requested, click the Authorize Order button. A summary page with your batch job confirmation number plus other batch output details will appear.
To print the information on the screen, click the Print Order Confirmation button.
To run another batch job, click Run Another Batch button to return to the Batch Services main page.
Back to top
Submit a Real-Time Phones Batch
The Real-Time Phones batch searches for data that will help government and law enforcement determine subjects' names and location based on phone number and address queries including phone type, phone status, carrier details, and porting indicator to allow for contact to be made with operating companies for case investigations, including issuing subpoenas when necessary.
Below are step by step instructions on how to submit a Real-Time Phones batch file for processing.
Append Fields
- Check the proper radio button to select a search option. Available options are:
- 10-digit Phone Number Search Only
- Name and Address Search Only
- Address Search Only
- LexID Search Only
- Name and Social Security Number Search Only (see Note 1)
- Search with Selected Input Fields (see Note 2)
- Use the down arrow under Select Special Processing Option and make a selection. The number chosen is the number of results (up to 10, with phone details) to be returned for each input record. The default is 2.
- Check or ignore the Include Geo Coding Detail option. When checked the output for each record will contain the latitude and longitude of the address(es) associated with the phone number.
- Check or ignore the Include Additional Address Detail option. When checked, the output for each record may contain such information as Congressional District, Carrier Route, Sort Zone, etc., of the address that is associated with the phone number.
- Click the Next button.
Note 1: Name and Social Security Number Search Only includes the Waterfall Search and Strict Search.
Waterfall Search
When users select the Waterfall search option the query will be conducted with the provided input data and attempt to find a result using the following search order:
- Subject First and Last Name and 9-digit Social Security Number
- Subject Last Name and 9-digit Social Security Number
- Subject First and Last Name and last 4-digits of Social Security Number
- Subject Last Name and last 4-digits of Social Security Number
Strict Search
When selected the query will be conducted with the provided input data and a result will be returned only if an exact match is made.
Note 2: Search with Selected Input Fields.
When selected the query will be conducted with the provided input data and attempt to find a result using the following search order based on input provided
- 10-digit phone number
- Subject name and address
- Subject name and Social Security Number
- LexID
- Address Only
Select the File to Upload
This will allow users to select the batch file for processing.
This will allow users to select the batch file for processing. For details please reference section Select the File to Upload of Common Steps.
Define Field Labels
In this step users define the data type contained in each of the columns within the batch file, be it SSN, name, or phone number. For details please reference section Define Field Labels of Common Steps.
The following is a list of data types for Real-Time Phones Batch:
- Client Id
- LexID
- Phone Number
- Full Name
- First Name
- Middle Name
- Last Name
- Address Line 1
- Address Line 2
- City
- State
- Zip
- SSN (9 digits)
- SSN (last 4 digits)
- Not Applicable
Note: The system does not validate the format of any data such as the zip or phone numbers.
Permitted Use Certification, DPPA Compliance and DMF Compliance
For details please reference section Permitted Use Certification, DPPA Compliance and DMF Compliance of Common Steps.
Batch Confirmation
This page allows you to review all batch settings and options, input file, email address, and the approximate charge for this batch, prior to batch submission. If any of the information needs to be edited, you can click the Back button until you reach the desired page.
If all selections and information are listed as requested, click the Authorize Order button. A summary page with your batch job confirmation number plus other batch output details will appear.
To print the information on the screen, click the Print Order Confirmation button.
To run another batch job, click Run Another Batch button to return to the Batch Services main page.
Back to top
Submit a Real-Time Motor Vehicle Registration Batch
The Real-Time Motor Vehicle Registration Batch searches motor vehicle registration records including real-time data to return registration
information such as name, address, expiration date, vehicle identification number (VIN), plate number and vehicle description. Available search options allow users to perform VIN, plate/state or name and address searches. Users will also have the option to return the most current address and phone number for the registrant as well as the option to return registrations for a specific date or a specified number of years.
Restrictions: The Real-Time Vehicle Registration Batch is subject to DPPA restrictions. A DPPA permitted use must be selected prior to querying the data and results will be restricted in accordance with the regulations of the state(s) involved.
Append Fields
This allows users to set search and output options for the batch job.
- Select a search option by checking one of the following three:
- Search with Selected Input Fields (Default Search Option) - search by all input fields (data types) in Define Field Labels
- VIN Only Search
- State/Plate Only Search
- Select output (special processing) options by:
- Checking either one of Return Motor Vehicle Registration for date provided and Return Motor Vehicle Registrations for the selected # of years (Default is most current). The two options are mutually exclusive.
Note: The Motor Vehicle Registration for date provided option can help to determine who the vehicle was registered to on a specific date. This option requires that the input file contain a Date or Year field which must be marked as data type Date to Search in Define Field Labels.
- Checking as many as desired from among the following:
- Return SSN for Registrant
- Return DOB for Registrant
- Return Most Current Address for Registrant
- Return Most Current Phone Number for Registrant
- Select a Real-Time Permissible Use from among the following:
Note: This is required because of vendor rules that are outside of the normal DPPA rules. It affects what data is returned to the customer based on what is selected. For example, there are certain states that may not allow access for insurance underwriting but will allow law enforcement to get returned data.
- GOVERNMENT
- INSURANCECLAIMS
- INSURANCEUNDERWRITING
- LAWENFORCEMENT
- LITIGATION
- PARKING
- PRIVATETOLL
- TOWEDANDIMPOUNDED
- VERIFYFRAUDORDEBT
- Click the Next button.
Select the File to Upload
This will allow users to select the batch file for processing. For details please reference section Select the File to Upload of Common Steps.
Define Field Labels
In this step users define the data type contained in each of the columns within the batch file, be it SSN, name, or phone number.
For details please reference section Define Field Labels of Common Steps.
The following is a list of data types for Real-Time Motor Vehicle Registration Batch:
- Client Id
- Full Name
- First Name
- Middle Name
- Last Name
- Address Line 1
- Address Line 2
- City
- State
- Zip
- Postal Code
- Year
- Make
- Model
- VIN
- Tag (Plate) Number
- Tag (Plate) State
- Date to Search
- Not Applicable
Notes:
- The system does not validate the format of any of the data types.
- To exclude an input data type from the search set it to Not Applicable.
Permitted Use Certification, DPPA Compliance and DMF Compliance
For details please reference section Permitted Use Certification, DPPA Compliance and DMF Compliance of Common Steps.
Order Summary Confirmation
This page allows users to review this batch setting and options, input file name and format, email address for notification, approximate charge for the job, prior to batch submission. If the information needs to be edited, you can click the Back button until you reach the desired page.
If all selections and information are listed as requested, click the Authorize Order button. A summary page with Your batch job confirmation number plus other batch output details will appear.
To print the information on the screen, click the Print Order Confirmation button.
To run another batch job, click Run Another Batch button to return to the Batch Services main page.
Back to top
Submit a Reverse Phone Append Batch
This process allows customers to run a query on a ten-digit phone number to find the current name and address associated with that phone number. Reverse Phone append also allows for de-duping to allow customers to only get back different information than what they may already
have.
Append Fields
In this step you set the output options for the batch at additional cost.
- To start, click the Reverse Phone Append link from the Batch Services main page. The Append Fields screen displays.
- There are two options on the screen: Select Special Processing Options on the top and OR Choose one of the following Special Batch Options at the bottom. There are three options on the top. The "Best Address -- By Date: Return Different Address and Phone" returns addresses and/or phone numbers. If an address and/or phone number is provided as input, the search will be conducted to only find addresses and/or phone numbers that are different and more current. The "Best Address -- By Date: Return Different Address" option returns addresses. If an address is provided as input, the search will be conducted to only find addresses that are different and more current. Phone numbers are not returned. The "Phones Only: Return Different Phone" option returns phone numbers. If a phone number is provided as input, the search will be conducted to only find phone numbers that are different and more current. Up to three phones can be submitted for comparison. Addresses are not returned. Alternatively, the option on the bottom can be selected to add up to five properties owned by the subject.
- Click the Next button to proceed to the next step or click the Back button to return to the Batch Services main page.
Select the File to Upload
This will allow users to select the batch file for processing. For details please reference section Select the File to Upload of Common Steps.
Define Field Labels
In this step users define the data type contained in each of the columns within the batch file, be it SSN, name, or phone number.
For details please reference section Define Field Labels of Common Steps.
The following is a list of data types for Reverse Phone Append Batch:
- Not Applicable
- LexID
- Full Name
- First Name
- Middle Name
- Last Name
- Generational Suffix
- Address Line 1
- Address Line 2
- Address Line 3
- City
- State
- Zip
- Postal Code
- Social Security Number
- Phone Number 1
- Phone Number 2
- Phone Number 3
- Date of Birth
- Driver's License Number
- Driver's License State
Note: Off this list the system validates the format of only two: the Social Security Number and the Phone Number. If the data is in conflict with the predefined data format, you will get a message, alerting you of the correct format for the data.
Permitted Use Certification, DPPA Compliance and DMF Compliance
For details please reference section Permitted Use Certification, DPPA Compliance and DMF Compliance of Common Steps.
Batch Confirmation
This page allows users to review this batch setting and options, input file name and format, email address for notification, and the approximate charge for this job, prior to batch submission. If this information needs to be edited, you can click the Back button until
you reach the desired page.
If all selections and information are listed as requested, click the Authorize Order button. A summary page with your batch job confirmation number plus other batch output details will appear.
To print the information on the screen, click the Print Order Confirmation button.
To run another batch job, click Run Another Batch button to return to the Batch Services main page.
Back to top
Submit an InstantID Batch (Consumers or Businesses)
InstantID batch service quickly searches billions of public records, alerting users to potential data mis-keys, which are often mistaken for fraudulent data. It automatically offers alternative addresses, telephone numbers and Social Security Numbers (SSN). InstantID combines verification, validation and risk detection processes to instantly authenticate consumer and business identities, spot potential fraud or identity theft, and flag discrepancies found in an applicant's data.
There are two types of InstantID batch jobs: Consumer (individual) InstantID and Business InstantID.
Choose InstantID Process
This step is for users to select to run Consumer InstantID or Business InstantID. To start:
- Click the InstantID Batch (Consumers or Businesses) link from Batch Services main page. Choose InstantID Process page displays.
- Check the radio button by Consumer InstantID or Business InstantID.
- Use the down arrow to select the Global Watchlist Threshold Level. This sets the level of selectivity (from 100% to 80%) in the global watchlist databases. Our system automatically runs each person in the batch with the watchlist database. The higher the number, the stricter the match rules. A threshold of 100% means that the search and result have to match exactly. A threshold of 80% means that additional fuzzy search logic will be used to look for spelling and name variations. The default is 84% match criteria. Flexible matching algorithms are used to reduce false positive hits and to take into account name variations. The matching score is displayed in the results with the highest scored records appearing first.
Examples:
Name: BIN LADEN
Max Match Score: 100 |
Name: USAMA BIN LADEN NETWORK
Max Match Score: 86.6 |
- Check or ignore Use Fraud Defender. FraudDefender (a LN service that helps to flag fraud) estimates the potential for fraud or identity theft to help identify the accounts that present the highest likelihood of fraud.
- Check or ignore Use Red Flags Rule. This option applies to Consumer InstantID service only. Red Flags Rule Report (a LN service that helps to flag identity theft) identifies suspicious personal identifying information and displays warning codes when red flags risk factors are present. When this is checked the output file will have a fraud red flag indicator.
- Click the Next button to proceed to the next step or the Back button to return to the Batch Services main page.
Select the File to Upload
This will allow users to select the batch file for processing. For details please reference section Select the File to Upload of Common Steps.
Define Field Labels
In this step users define the data type contained in each of the columns within the batch file, be it SSN, name, or phone number. For details please reference section Define Field Labels of Common Steps.
The following is a list of data types for Business InstantID Batch:
- Not Applicable
- Account Number
- Account Open Date
- Company Name
- Company DBA
- FEIN
- Company Address Line 1
- Company Address Line 2
- Company Address Line 3
- Company City
- Company State
- Company Zip
- Company Phone Number
- Authorized Representative Full Name
- Authorized Representative First Name
- Authorized Representative Middle Name
- Authorized Representative Last Name
- Authorized Representative SSN
- Authorized Representative Address Line 1
- Authorized Representative Address Line 2
- Authorized Representative Address Line 3
- Authorized Representative City
- Authorized Representative State
- Authorized Representative Phone Number
- Authorized Representative DOB
The following is a list of data types for Consumer InstantID Batch:
- Not Applicable
- Full Name
- First Name
- Middle Name
- Last Name
- Generational Suffix
- Address Line 1
- Address Line 2
- Address Line 3
- City
- State
- Zip
- Social Security Number
- Phone Number 1
- Phone Number 2
- Phone Number 3
- Date of Birth
- Driver's License Number
- Driver's License State
Note: The system does not validate the format of any of those data types.
Permitted Use Certification, DPPA Compliance and DMF Compliance
For details please reference section Permitted Use Certification, DPPA Compliance and DMF Compliance of Common Steps.
Batch Confirmation
This page allows users to review this batch setting and options, input file name and format, and email address for notification, prior to batch submission. If this information needs to be edited, you can click the Back button until you reach the desired page.
If all selections and information are listed as requested, click the Authorize Order button. A summary page with your batch job confirmation number plus other batch output details will appear.
To print the information on the screen, click the Print Order Confirmation button.
To run another batch job, click Run Another Batch button to return to the Batch Services main page
Back to top
View and Download the Output File
Batch output files are stored in the Report Manager of My Account.
- Click the Batch Output link under My Account. You are prompted to Verify Password if this is the first time of the session that you try to access My Account.
- Enter your password, and click the Continue button. You are brought directly to the Batch Results page of the Report Manager. The following information on this page may be of interest to you.
- Job ID - The confirmation number generated by the system after you submit a batch order.
- Job Name - The alpha-numeric string you enter in the File Reference Name field in Select the File to Upload.
- Product Type - The type of batch job you submitted. For example: Real Time Phones Batch.
- Date Submitted - The exact time (date and o'clock) of the submission of the batch file.
- Status - The progress of the batch process. In Progress means the system is still processing the data. Completed means the report is ready for review/download.
- Click the icon
 under Download Results. The File Download dialog box pops up.
- To view, click Open. To save it to your local hard drive or to a disk/CD, click Save.
Back to top
